Share Folders in Ubuntu & Access them from Windows 7

Before starting folder sharing you need to install the samba server in the Ubuntu Computer and Enable file sharing and in Windows create a workgroup and Enable the file sharing.

Share Folders in Ubuntu

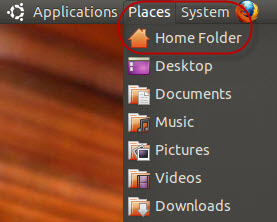
Open the Home Folder in Ubuntu, found in the Places Menu.
001

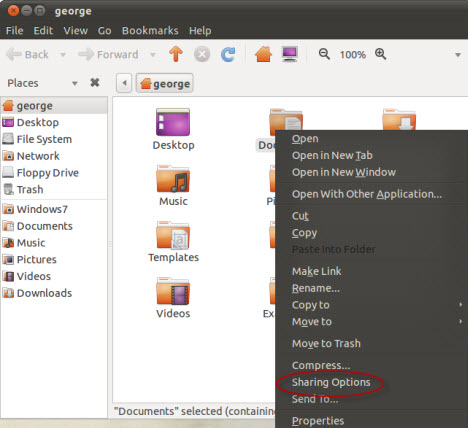
Right-click on the folder you want to share and Open the Contextual Menu and Click on Sharing Options.
002

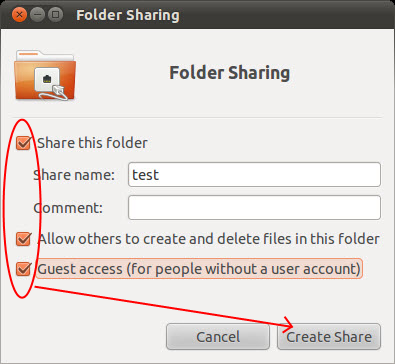
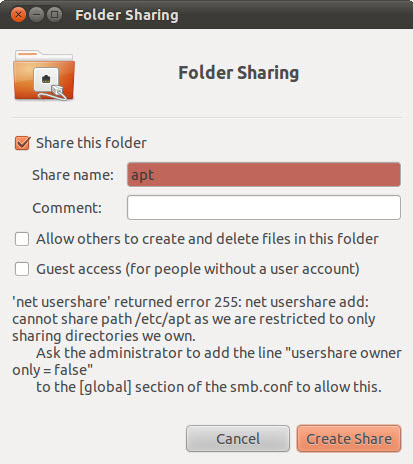
The Folder Sharing window will Open. Check the box next to ‘Share this folder’. Then, in Share name field, type the share name you want to use. In Comment field type anything you want or just leave it empty – there’s no need to complete it. If you want to allow others to create and delete files in the folder you are sharing, check the box next to ‘Allow others to create and delete files in this folder’. Also, if you want to allow Guest access, check the box next to ‘Guest access (for people without a user account)’. When done, Click on Create Share to actually share the folder.
003

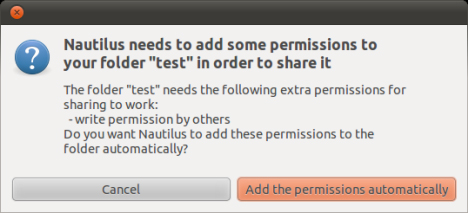
If you have selected the option ‘Allow others to create and delete files in this folder’ a pop-up shows up, asking if you want to add some permissions to the folder you are sharing. Click on the ‘Add the permissions automatically’ button. Now, the folder is shared with the rest of the network.
004

Note:-

I recommend that you only share folders found or created in the Home Folder because those are the folders on which your username has ownership. If you try to share a folder outside the Home Folder, you will receive the following error message: “net usershare returned error 255: net usershare add: cannot share path as we are restricted to only sharing directories we own.” This error appears because you don’t have ownership on those folders. In order to share any of them you have to go through a complicated procedure that has the potential to add security risks to your Ubuntu Computer.
005

Accessing Ubuntu Shared Folders from Windows 7

After you shared a folder in Ubuntu, let’s see how to access that folder from a Windows 7 Computer.

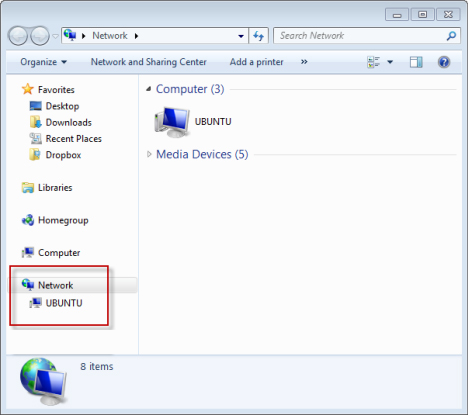
Open Windows Explorer. Click on Network to view a list with all computers available (turned on at that time) in the Network.
006

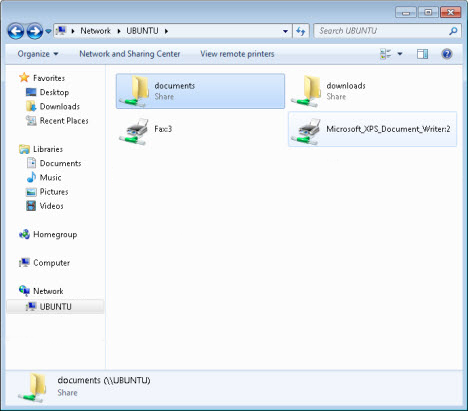
Double click the Ubuntu Computer you want to access. A list with all the shared folders and devices from that Computer Opens.
007

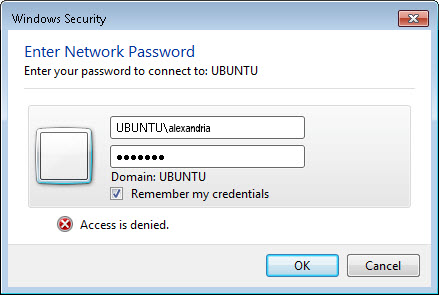
Double click the folder that you want to access. If you haven’t setup the shared folder to allow Guest access, you are asked to introduce a username and password.

In the first input field, type the name of the Ubuntu Computer followed by a backslash (“\”) and the name of the user account with access to the shared folder. In the second input field type the password. If you want Windows to remember your username and password, check the box next to ’Remember my credentials’. Click on OK.
008

Now the content of the shared folder is shown.
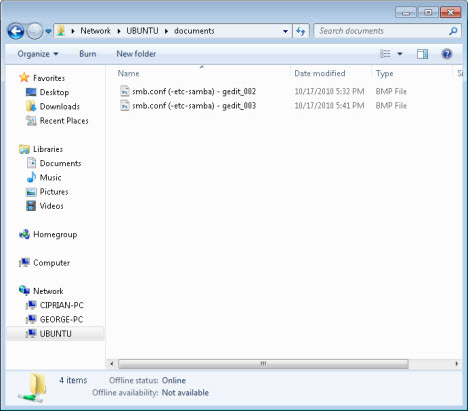
009

Note:-

Network with Windows 7 and Ubuntu Computers, you can configure Ubuntu to share files and folders which are easily accessible from a Windows PC.

All Done!

Installing Samba on Ubuntu

SAMBA

Samba is an easy way to share files over Linux And Windows environment. Samba is presented by samba.org and is an Open Source/Free Software suite that provides seamless file and print services to SMB/CIFS clients.

INSTALLING SAMBA

Lets Update first the repositories.

Open a Terminal and type the following :

alexandria@root# apt-get update

Now install samba

alexandria@root# apt-get install samba

Now lets edit the configuration file of samba, but before that lets backup the initial configuration file.

alexandria@root# cd /etc/samba/
alexandria@root# cp smb.conf backsmb.conf

Setup public folder:

First we will create the configuration for a share folder accessible from everyone without any user need it

alexandria@root# nano smb.conf

Add the following to this file:

#
[global]
workgroup = Workgroup
server string = My Samba Share %v
security = user
map to guest = bad user
dns proxy = no
#
[ShareFolder]
comment = This is a folder accessible from everyone
path = /sharefolder
browsable = yes
guest ok = yes
read only = no
create mask = 0755

Next we need to create the directory that will host the share folder and change the user permissions

alexandria@root# mkdir /sharefolder
alexandria@root# chown -R nobody:nogroup /sharefolder/
alexandria@root# chmod 755 /sharefolder/

Now lets restart the samba server

alexandria@root# /etc/init.d/samba restart

Normally at that point you should be able to access this share folder from Linux or Windows without any user credentials

NOTE:-

In older versions of samba in order to restart samba server you need to run “sudo /etc/init.d/smbd restart”

CREATING PRIVITE FOLDER ONLY FOR UNIX USERS

Lets first create the a User named smbuser:

alexandria@root# useradd smbuser

lets create a password for smbuser that will be used for accessing the samba share

alexandria@root# smbpasswd -a smbuser

now the directory for that user:

alexandria@root# mkdir /smbuserdir
alexandria@root# chown -R smbuser /smbuserdir/
alexandria@root# chmod 755 /smbuserdir/

edit the samba config again:

alexandria@root# nano /etc/samba/smb.conf

Add the following:

#

[smbuserdir]
comment = This is a folder accessible from smbuser

path = /smbuserdir
browsable = yes
guest ok = no
read only = no
create mask = 0755

now restart samba deamon

alexandria@root# /etc/init.d/samba restart

In order to access the share folder you need to use for username: “smbuser” and for password the password you create when you add the user.

All Done!

Fix error HRESULT 0xc8000222 In Net Framework Installation

The problem we often have here is the error msg like HRESULT 0xc8000222 when we are about to finish the Net Framework installation.

Please follow the below steps to complete the framework installation without error :

  • Click START > ALL PROGRAMS > ACCESSORIES > right click COMMAND PROMPT and choose run as administrator (A command prompt window will open).
  • Type : net stop WuAuServ in the command prompt and leave it that way for a second.
  • Now click Windows > R > and type %windir%
  • Find a folder named SoftwareDistribution. Rename it with any name (we don’t use this folder anymore, Renaming it is only for back up purpose).
  • Back to command prompt again and type net start WuAuServ.
  • Finish your net framework installation.

All Done!

Install Google Earth on Kali linux

Open Terminal

root@alexandria:~# apt-get install lsb-core

Then open browser and enter the url:

http://www.google.com/earth/download/ge/agree.html

Then select your download package and download it. Then open terminal and install the Google Earth:

root@alexandria:~# dpkg -i google-earth-stable_current_i386.deb

To open Google Earth, open terminal:

root@alexandria:~# google-earth

All Done!

Firewall Policies

To protect private networks and individual machines from the dangers of the greater Internet, a firewall can be employed to filter incoming or outgoing traffic based on a predefined set of rules called firewall policies.

Policy Actions

  • Packets flowing through a firewall can have one of three outcomes:
  1. Accepted: permitted through the firewall
  2. Dropped: not allowed through with no indication of failure
  3. Rejected: not allowed through, accompanied by an attempt to inform the source that the packet was rejected
  • Policies used by the firewall to handle packets are based on several properties of the packets being inspected, including the protocol used, such as:
  1. TCP or UDP
  2. the source and destination IP addresses
  3. the source and destination ports
  4. the application-level payload of the packet (e.g., whether it contains a virus).

Blacklists and White Lists

There are two fundamental approaches to creating firewall policies (or rulesets) to effectively minimize vulnerability to the outside world while maintaining the desired functionality for the machines in the trusted internal network (or individual computer).
  • Blacklist approach
  1. All packets are allowed through except those that fit the rules defined specifically in a blacklist.
  2. This type of configuration is more flexible in ensuring that   service to the internal network is not disrupted by the firewall, but is naïve from a security  perspective in that it assumes the network administrator can enumerate all of the properties of malicious traffic.
  • Whitelist approach
  1. A safer approach to defining a firewall ruleset is the default-deny policy, in which packets are dropped or rejected unless they are specifically allowed by the firewall.
All Done!